This post was mode on 10/13/2019.
In this post I will be doing a step by step breakdown of how to replace the left Joy-Con analog stick with pictures and instructions. Strap in cause this is gonna be FUN!

First, your going to need to make sure you have a 2.0 tri-wing screwdriver to open the Joy-Con shell. Your also going to need a 2.0 Philips head screwdriver to unscrew some screws and some tweezers to detach and attach small cables. You are also going to have to get a replacement analog stick a have a link here. There is a link here for the tools to take apart a Nintendo Switch and the Joy-Cons but you could also just find individual tools on Amazon if you just need one or two tools. You should also have a small box or container to put your screws in so you don’t lose them

The first thing your going to want to do is flip your left Joy-Con over and find the four tri-wing screws. I have arrows pointing to them in the picture above. Grab your tri-wing screwdriver and screw them off the controller. After the screws are off, put the tri-wing screws aside and pry off the shell casing carefully because there are some cables attached to them.
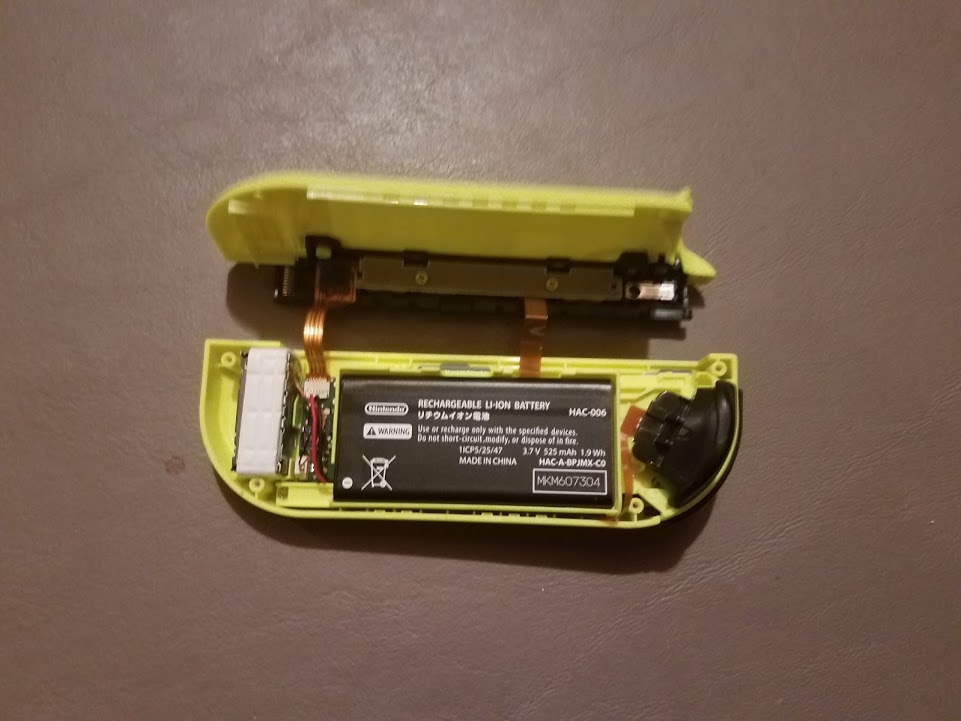
Now that the shell is off, you can see the inside of the Joy-Con and there is a lot of stuff in there but the only thing your going to want to worry about right now is the battery in the picture above. Now your going to want to get under the battery and pry it off gently as to not break any wires. This part can be tricky because the battery is glued to the plastic but you can use the tweezers to get under it and pry it off.

Now that the battery is off put it to the side while it’s still attached to the controller. There are 5 screws that you can see in the plastic holding the battery you only need to unscrew the 3 pictured in order to get the plastic piece off. Grab your Philips head screwdriver and unscrew the 3 screws listed above. Once those 3 screws are unscrewed you can put the screws aside and put the plastic piece off to the side but still attached to the controller with a cable.

Now you can see the motherboard and this is where all the buttons and functions of a controller are, so be careful with this part. Along the right side of the motherboard you’ll see a metal-looking square with two screws holding it down. This is the analog stick that were going to replace but first were going to have to detach a cable that is blocking one of the screws.

In the picture above, you’re going to have to detach those cables to remove the analog stick. Grab your tweezers and go to the end of the cable, where it is attached to the motherboard, and you’ll find a port that has a little plastic lever piece on top of it. This plastic lever holds the cable in place when it is locked so were going to flip the plastic lever piece upward to release the cable and then use your tweezers to remove the cable from the port. Do this for the two cables above to access the analog sticks screws.

Now were going to unscrew the screws on the analog stick with our Philips head screwdriver to fully remove it. You may have to move the cable covering the one screw in a 90 degree angle to unscrew that screw. Put the screws aside once unscrewed and now you can now gently remove the analog stick and put it aside.

Now that we have the old analog stick removed we can replace it with a new one. Put the new analog in the controller and make sure its screw holes line up with with the screw holes on the controller.


Now that the analog stick is in and lined up properly were going to screw it in with the Philips head screws that were used on the old analog stick.


Now were here is the tricky part. We have to put the cables that we detached back into the ports we removed them from. Grab your tweezers and grab one of the ends of two detached cables and guide the cable back into its assigned port. This can take a few tries to do but once the cable is in the port use the tweezers to flip the tiny plastic switch on top of the port into the locked position. You can tell the little plastic switch is locked when it is downward facing. Once both of these cables are in their ports we can move on to the next step.


Put the plastic piece back on and make sure it is lined up with the proper screw holes and then screw in the Philips head screws back into place with your Philips head screwdriver. You can use the picture above with red arrows to help you line up the plastic piece properly.
Now you can put the battery back in place on the plastic piece. Make sure the battery cable is in the proper place inside the controller.


Now were going to put the plastic shell back on and click it back into place. The screw holes should line up properly and the shell should be fully back on the controller. Now let’s grab our tri-wing screwdriver and the tri-wing screws and screw them back into the four holes listed in the picture with the red arrows above.

You did it! The left Joy-Con controller is now fixed with a brand new analog stick! You should test it out on a Nintendo Switch console to make sure it works properly and there are no issues.
I hope you found my instructions for the Nintendo Switch left Joy-Con controller analog replacement helpful and useful in your repair!
